. . if you'd like to follow my progress on the Lynden layout, I've (of course) started a new blog right here:
https://lyndenbranch.blogspot.com
I hope you check it out from time to time.
Sunday, February 25, 2018
Sunday, February 18, 2018
End of the Line, for Now. . .
Since updates on the Buggardine/Narrabri/Australian outline layout of mine have gotten less and less frequent, astute followers (or those those who still follow this blog, anyway. . . ) might assume that something's going on.
Well, for a long time, nothing was going on.
When I last updated, in 2015, we were on the verge of making a big change in our lives: an attempt at moving into a vintage 1950's Mid-Century home on the outskirts of downtown Fort Worth. I realized, of course, that making the move would involve some compromises--one being that the amount of space for a model railroad would be reduced once more to that of an average bedroom. But, it was a change I was willing to make for my wife and I to purchase a home we really wanted.
Because Model Railroads are really not a common thing to find in a house, our realtor suggested that I removed the railroad from our "game room" in which it resided. This being a big, open upstairs space with a big window overlooking the backyard, it would be a natural selling point for our home. I reluctantly agreed--in part. I removed two of the three walls worth of layout as well as the staging area in the adjacent bedroom and plugged up the holes in the walls. I retained the center part of the layout--the central area of Buggardine. Operations could still continue though without much for a staging area.
As it turned out, fate intervened. We listed our home at the end of summer--death for selling, as it turns out, as families most interested in our neighborhood had turned their interests towards the new school year, not in buying houses. Our contract period was nearing its end, the sellers of the house we were going to buy were getting anxious. . .and then my wife took ill: in the "doc in the box" for an unrelated issue, the doctors discovered an aneurysm deep in her brain that required immediate surgery. We elected at this point not to continue efforts to buy a new house, and put her recovery in the top priority.
A few months later, I had my turn at a medical issue: I suffered a very mild heart attack, and required two stents to improve blood flow.
The model railroading took a very back seat.
Around this same time, my immediate hobby interests had shifted back towards my photography, specifically to the work I'd done on the Milwaukee Road in the late 1970s and early 1980. Inspired in part by the series of books of NSWGR railroading in the late 1960s by the Wheatley brothers, I decided the time was right to get working on my own volume of photographs and essays on the Milwaukee Road in its last years of operation. With some luck, maybe I'll have this book on the market in some form by the 40th anniversary of the Milwaukee's last run out of Tacoma, Washington in March of 2020.
My research on the Milwaukee Road, which I'd largely ignored for many years, has reinvigorated my scale modeling interest, manifesting itself in wanting to model scenes and memories from my own teenage years. It's not that I was dissatisfied with my modeling of Australian subjects--not at all--it was just "time," I suppose, to bring those efforts back closer to home.
Frankly, modeling Australia from the United States was a pretty lonely modeling experience. Certainly that was the case living in Texas. As I think I'd mentioned previously, it was hard to generate much interest or enthusiasm or understanding in others about WHAT I was modeling. Most other modelers "just didn't get it." I can't blame them, really. And while I treasure the acquaintances and friendships I've made in the past 8 years researching, modeling, and traveling to see Australian railways, in many cases Model Railroading IS a social hobby: we want feedback, we want to feel part of a group, and we want to discuss shared experiences. I certainly got that from my Australian friends, but not so much from local friends. This was my fault as much as it was theirs. And it was time to reconnect with them on a common point of American railroading.
So, for now, the Australian models are carefully packed into plastic tubs. Easily accessible, by the way. But for the next bit, I'll be back to modeling an American railroad, the Milwaukee Road. It's not a "grand" concept, rather, a simple one, very much based in many of the Australian layouts I most admired: a single location. End of a branch line. Light traffic. A chance to really dig deep in detail in track and structures and equipment.
I'll be modeling the stub-end branch in Lynden, Washington, circa 1976-1979. A small town at the end of a five-mile branch off of another branchline in remote northern Washington state. Light rail--60 lb. was common, thus I'm using Code 55--with only seven turnouts. A half-dozen shippers. A mix of covered grain and fertilizer hoppers, insulated boxcars, mechanical refrigerators, and miscellaneous boxcars and flats. An industrial base of agriculture: feed and fertilizer in, frozen fruit, vegetables and condensed milk out.
I've not yet decided if this latest layout will have a blogspot home. but if it does, I certainly will post the information on North of Narrabri.
Thank you.
Wednesday, July 8, 2015
Running Night #2

Two-loco wheat meets the goods train shunting at Buggardine
A few photos from this weekend's running session, occasioned by the visit to our neck of the woods by modeler John Gillies of Canberra, in the states for a couple of months to take in a prototype modeling meet, the NMRA convention, and the Northern Pacific Historical Society convention. . . and see a lot of our great country en route. John's visit motivated at least three of us here in DFW to get some progress done on their layouts.
Unfortunately, I didn't get a shot of John operating! But heres some other views.
Won't be much progress for a while now on the layout. Got a family vacation coming up and some photo work that needs to be done, but will take up in a bit with the start of ground covering and ballast.

Matt Sugerman, Camas Prairie modeler, photographs the 620/720 set coming out of the hills

620/720 arrives Buggardine
Buggardine goods shunts its train while the 620/720 waits at the station for departure

Matt Sugarcane brings the empty wheat down the 1:40 grade to Buggardine.
Friday, June 26, 2015
A week's progress. . .

Some scenic material sprinkled into the scene, just to take a look.
Look at the photo above and help me decide. There's really three shades of earth tones here, and not sure which will be the most effective. First, there's the tinted joint compound color, which I've liberally painted the layout with. It's probably as good a match as I could get in the Behr line of paints from Home Depot in a can. Then, there's the stuff that looks sort of like a greenish tint of ground cover: that's REAL dirt from Texas, gathered from a construction site a half-dozen years ago where earth movers and trucks had smashed it into as much of a powder as I could find. The there's a greyish commercially sold ground cover called "Kiabab," seen just above and to the right of the locomotive's nose.
Viewed separately, any one of these colors looks like dirt. But compared to each other, they look radically different. Assuming the layout surface is "most correct," the real dirt almost looks like an organic material, it is so green by comparison. And the Kiabab, which looks almost yellowish while in its plastic pouch, looks fine and grey, almost like ash.
So what's the solution? Should I stick with the joint compound color as the ideal? Should I screen, sieve and use the big bucket of Texas dirt, hoping its overwhelming use on the layout will shift my eyes with time into thinking it is more dirt colored than organic color? Or should I use the grey Kiabab?
I could always use the real dirt and paint it when it is on the layout, but that'll be a chore. No one said this scenery stuff would be easy. I'm guessing once the whole layout is covered in the real dirt, it won't look so green anymore--and will look less so with the addition of other scenic materials representing field grass, weeds, grass tufts, etc.
Otherwise, this is the progress I've made in a week. The raw shaped foam has been sanded, covered with plaster cloth and then covered once more with tinted joint compound. I used a pre-mixed USG brand that apparently can be stored for several months (scrape off the icky moldy top surface however), shapes very well, takes latex paint as a tint like a champ, and sets up and dries in a day--with the added bonus that if you need to reshape something, simply wet it and it is again workable. Very cool stuff. By now, 90% of the layout surfaces--hills as well as in Buggardine itself--has been given at least a thin layer of this stuff. Looks great. Another step forward.
Once I can decide on the base dirt ground cover, we can get along a bit further. But each step I move ahead, the more enthused I am this the railway is moving beyond Plywood Pacific level.
Wednesday, June 17, 2015
The scenery deadline. . .

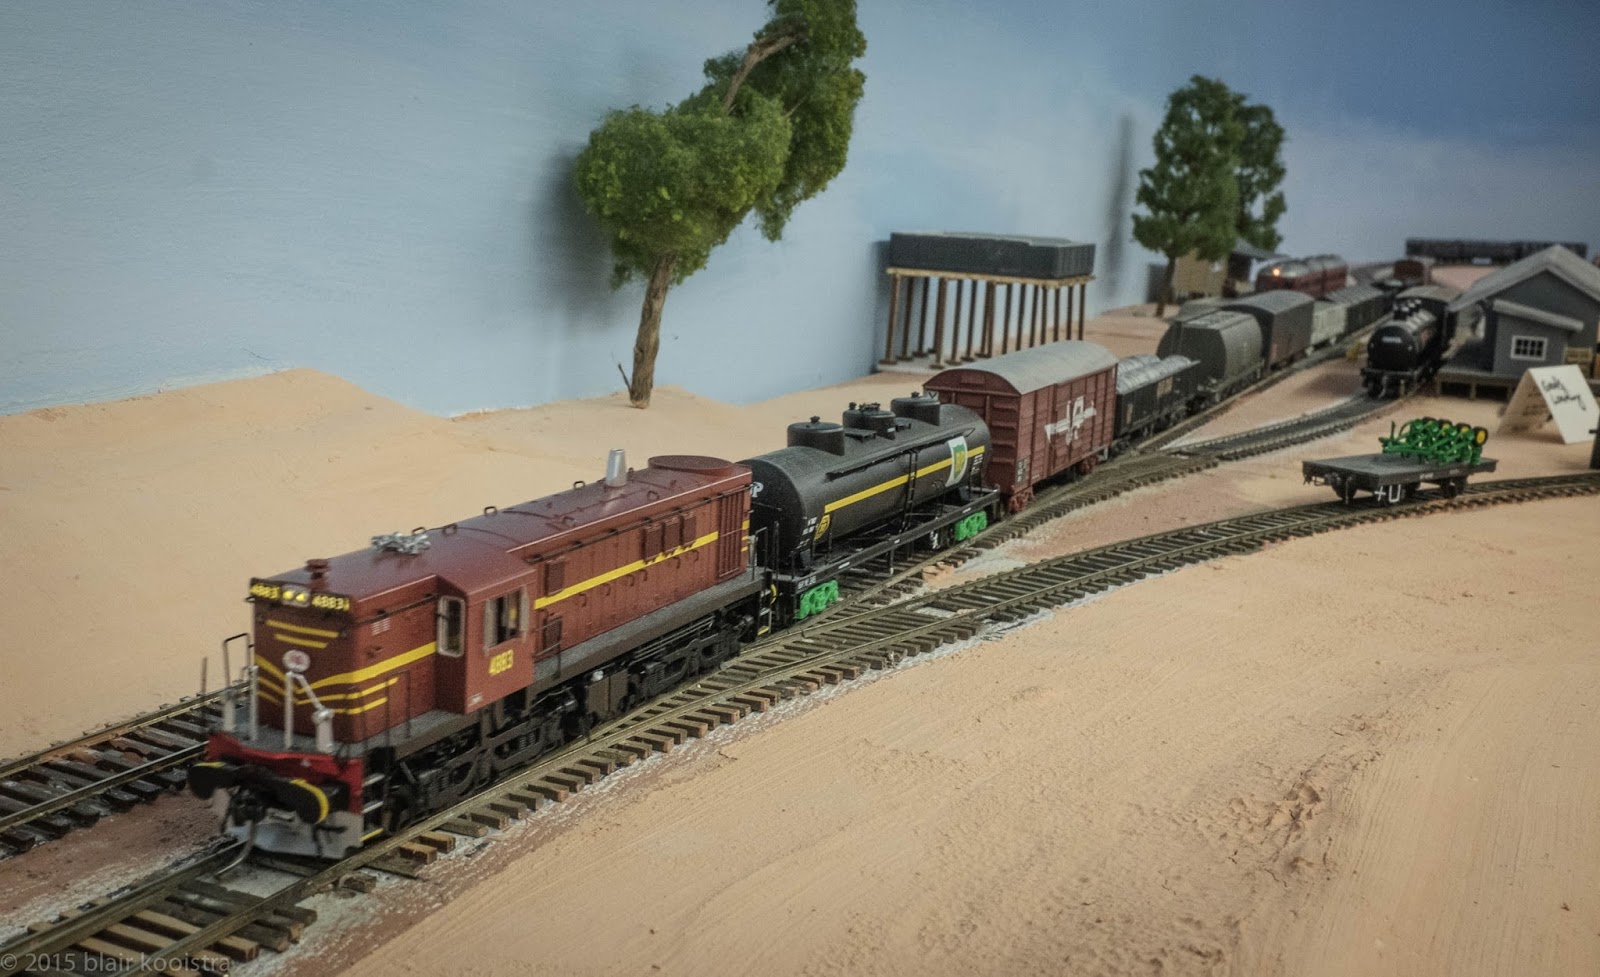
Out of the hills with a trainload of empty wheat wagons. . .
I've written several times about the importance of deadlines to my modeling. Self-imposed, nearly entirely, but and upcoming event, operating session, or visitor gives me impetus to buckle down and get a bit more modeling done. And that's the case in the last few weeks of June, as we prepare for a visit from an Australian modeling friend, coming to the states for a few weeks to attend modeling conventions, making a stop for his first few days here in Texas so we can show him some real Lone Star hospitality. Yeeeee Haw! (For the record, I do not say things like "Yeeeee Haw!").
So since my chances to show off my Australian-themed layout to an actual Australian are limited, I take advantage of whatever situations I can, so I'm trying to get the rough scenery forms in place in time for his visit. And I'm not the only one preparing for his arrival: Lance (Tocumwal themed layout) is cleaning up his layout room. Matt (Camas Prairie themed layout) is land-laying critical turnouts to allow at least a little throttle time to our visitor.
So, here's the progress after a few days cutting, gluing and (ugh) sanding/forming foam boards. I was originally going to go with the traditional aluminum screen overlaid with plaster-soaked paper towels, but it didn't give me the softly rolling land forms I desired. So I turned to 2" foam (blue stuff, made by Dow), which I was able to secure for a bargain price of about 20% of list from a vendor in Lewisville, about a 40 minute drive from the house. I tried various methods of cutting the stuff (hand-held key-hole saw, jigsaw, hot knife) but each had their advantages and disadvantages. So I went with the mix, and toxic fumes and static-charged little balls of blue foam dust were dealt with, and this is the scene I've come up with coming down the hill out of staging. Trees are in place merely for this photo. I've still got to give it a thincrete coating to seal the foam in place before adding any scenery materials. But so far, so good. I wasn't able to photograph such scenes back in the late 1970s, but through the magic of modeling, I'm able to create the past and enjoy it without leaving home.
Sunday, February 8, 2015
Operations begin!

Chris Palmieri, left, and Chris Atkins, right, shunt a wheat train at Buggardine with a pair of 48-class

They'rrrrrreeee Herrrrrreeeeeee!
The 48s
Yep, they've arrived, and they're everything I'd hoped for in terms of detail and performance. I really have nothing to nit-pick about them, and they operated quietly and smoothly right out of the box. Was the wait since October 2008 when I plunked down full $$ for them "worth the wait"? I certainly would've liked to have had them a year ago, or three, or even six. . . but in the grand scheme of things, getting them six years ago may well have kept me from experiencing a lot of good family time I'd otherwise spend working on the double-decked Narrabri railway, so from that respect, the timing of their arrival in early 2015 with the more-manageable single deck Buggardine fully in place and ready for operations worked out pretty well.
I did purchase one of the "new" Powerline 48's during the intervening years, and with the Traino's in place, it'd be a good opportunity to compare the two. THAT had to wait, because lazy me here had paid for a local hobby shop to replace a blown decoder board, and THAT process took a couple of months (Christmas holidays, you know) and several false starts because the loco continued to blow decoders up. Finally, after waiting long enough, I just asked for the damned thing back; they'd repaired a short in the Powerline motor, however, that was causing the decoder-smoking shorts.
The Powerline 48 is slightly heavier. Their version of "indian red" is quite orange; the added detail to the basic shell is considerably clunkier than on the TrainO model. The underframe detail is comparable, though the Powerline seems to have some sort of representation of a staff exchange mechanism, which weren't included in nearly all of the 48s past the first few original examples. The handrails are molded plastic on the Powerline, much larger in diameter, and while initially flexible, more prone to damage in my opinion. I'll give the nod to the Powerline for the etched steps--those that the model still has, as I've lost a majority of them in the processes of removing and reinstalling the very tightly-engineered body shell.
For now, my Powerline 48 is in storage pending the need to rewire, repair, and replace broken or missing parts. I can't say the money spent on this model was "well spent" compared to the TrainO version.

Ready for Service: 4883, 4858, 4867
LokSound with DCCSound's project
I've not often been a proponent of sound-equipped locomotives. Many layouts I've operated in the past have had many, many locomotives, all roaring away with too-loud sound--headache inducing! I DO think operating with sound, however, subconsciously makes operators run more deliberately, more slowly, and makes them take their time in their switching operations. Far less run-and-gun, how-fast-can-I-get-this-done sorta thing.
I previously had two NSWGR locomotives equipped with sound, the Trainorama 44 and 47 class (there would've been a third, a 49 class, but I kinda toasted the decoder during install!). Both of these are equipped with Tsunami decoders. They sound good enough, I guess, and are reasonably priced. I don't presently have Decoder Pro in my arsenal to manipulate CV settings on decoders, so missing the ability to program speed curves in a reasonably simple and straightforward way on the Tsunamis (Soundtraxx doesn't support the CV5 and 6 variables) somewhat has hindered their operation on the layout (and that's my fault).
But the prospect of having REAL 48 class sounds and the Cadillac of decoders, the LocSound v4.0, in the 48 class was too good to ignore, given the good things folks had written about DCC Sound in Melbourne. The prospect of going overseas for a digital project seemed a little excessive, however, but a happy coincidence has one of DCC Sound's engineers living a dozen miles from me in Texas!
I couldn't be happier with my experience visiting Phil Dunlop, DCC Sound's "western United States" representative. Phil spent a lot of time with me explaining LokSound's open architecture in its v4.0 decoders; showed me the digital flow charts that go into making these sound projects, and made sure my decoder's throttle functions were mapped just how I wanted them. A fine asset to the operation. And I'd recommend DCC Sound to modelers of U.S. Prototypes as well--they have an expanding line of North American prototype projects.
The install was relatively easy, involving plugging the micro v4.0 decoder into the 8-pin, and replacing the stock TrainORama speaker with a smaller but throatier Sugar Cube 11X15mm speaker sourced through Streamlined Backshop (superb quick service in the US).
Sure, the LokSound decoders are around 25% pricier than the Tsunamis, but that's a relatively small financial hit when you consider how much locomotives, rolling stock, and the materials it takes to make a layout cost. There's a HUGE difference between the sound a real 6-251T Alco prime mover makes installed in the 48 class compared to the "close but no cigar" sound offerings from Tsunami: a 12-cylinder 251, 539T or 244-series alcos do NOT sound anything like the little in-line 6-cylinder 251T. . . nor are the whistle offering in the Tsunamis anything like the WABCo 4-chime horns found on the 48s. Since I'm starting from scratch with sound locomotives, and I don't have that large a fleet to equip, it just makes sense to get the sound right if the opportunity is there. And I've been able to make all the momentum and speed curves I need with the LokSounds right on the layout without supplemental hardware and a computer. I'm sorta thinking at this point that the 49 Class will soon be outfitted with a DCC Sound decoder as well.

Loco 4716 takes a spin on the Buggardine turntable. . .
First Operations!
A couple of days ago, I invited a couple of Chris' over to be the first to operate on the railway. It wasn't supposed to be a "real" operating session--that is, with train lists, a program of trains to run, etc.--but my obsessive/compulsiveness dictated otherwise. I was ready to make it just a 'shake down' cruise, looking for feedback on the track plan, operating scheme, and most importantly at this point electrical, trackwork and rolling stock gremlins. I'm happy
So thanks to Chris Palmieri and Chris Atkins for burning a part of a beautiful late-winter Saturday afternoon to come over and play trains. It'd been quite awhile since I'd spent much time with either of these guys--Palmieri not too long ago returned to Fort Worth from a railroad assignment in Lincoln, Nebraska; and I've been remiss in not hanging out with Atkins in the past few years since we were part of the "Pie Night" crew here. Chris Palmieri has a very nice blog/website on his freelanced Meridian Speedway railroad group, and he brought one of his very attractively painted C40-8 locomotives over show it off--very nice, and HUGE compared to the smaller Aussie rolling stock. I swear I could hear the light rail strain under its weight! Chris Atkins is just getting started in putting a large double-deck layout in a former Texas & Pacific bunk house (formerly owned by Shane Murphy, who had his own double-decked layout in the building earlier).

A switch list made up on proper paperwork. . .
We operated far more than a "usual"schedule of trains into sleepy old Buggardine, to wit:
- downbound stock-extra with seven sheep/cattle wagons for loading;
- 12-wagon wheat extra with a pair of 48-class for loading at the silo and departure;
- 620/720 diesel motor train arrival and departure;
- regular goods train ex-Dubbo and return
- upbound extra with the livestock wagons and four OCY/OCX with containerized cotton

Something's not right here! We closed out the session with Chris Palmieri's Texas & Great Northern C40-8 leading a pair of tiny-by-comparison 48 class out of Buggardine. Rumors of the T&GN's interest in the Buggardine line as an acquisition are unfounded. . .
Friday, January 16, 2015
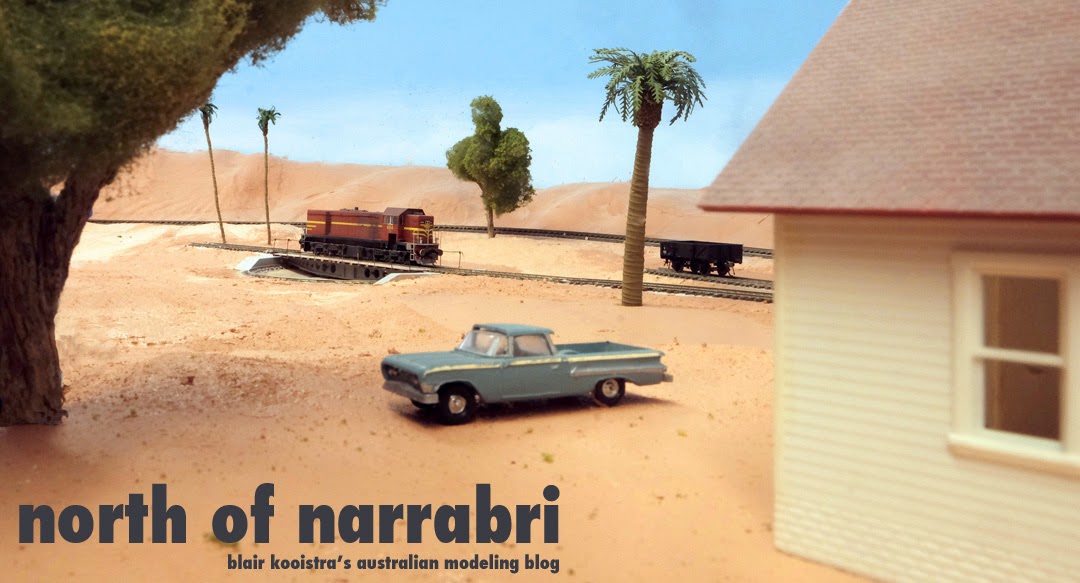
New blog banner photograph!
As you can see, the familiar glinty-44-Class-with-grain-wagons is gone at the top of the page.
This has been replaced by a scene photographed just a few moments ago on the Buggardine layout, after a few hours of scenery work.
I bit the bullet and overcame my fears of installing the Anton's Sellers turntable a couple of days ago, attaching the MRC auto-reversing module to the powerleads, drilling and installing the manual control rod through the fascia, and screwing the turntable itself into the baseboard. Then it was the usual track installation and today adding basic scenery around the turntable, tying it into the rest of the layout.
Yes, the locomotives clunk on and off the thing, just like they do on prototype turntables. And, yes, with the manual control, my hand after turning that little knob 20 or so times to turn a locomotive gives me the 1/87th equivalent feeling I'd stood in the pit and turned that thing by hand. Yessiree.
But the scene: there isn't any dirt, or vegetation, or dried grass, gravel or any of that kind of stuff. Right now, the scene looks as if the north slope of the Warrambungies has been in a pretty long drought. The layout will eventually represent a dry spell, but not this dry! So, for now, please excuse the lack of scenery materials. We'll get there eventually.
The structure on the right is the stand-in Station Master's residence. There'll be a small crew barracks in the distance at some point as well, and who knows where the trees will end up. And I'm hoping that Australia had the equivalent of a 1959 Chevy El Camino ute--a true Jetsons mobile.
So far, so good. I like the feeling I'm getting from this railroad. And this scene, bleak as it is, really puts me there, in my fictional Buggardine, sometime around 1975. It's pushing 40 degrees C, there isn't a breeze to be found, and the photographer is standing under one of the few shade trees while the crew of the goods train is in the pit attempting to turn their single 49 class loco.
Subscribe to:
Posts (Atom)